For Pentip 5
How to Use Pentip
Start with the simplest thing, your first note, and go one step at a time. Every step shows you the screen.
Chapter 1
Your first note
Make a shopping list from start to finish, one thing at a time.
-
Make a new document
In the library, tap New, then New Document.
In the library, tap New, then New Document.
Tip The same menu makes a whiteboard, flashcards or a folder.
Tip The same menu makes a whiteboard, flashcards or a folder.
-
Give it a name
Tap the name field and type a name, like Groceries.
Tap the name field and type a name, like Groceries.
Tip You can rename it later in the library.
Tip You can rename it later in the library.
-
Choose the paper
Tap Page Template and pick a paper. Here it is Grid.
Tap Page Template and pick a paper. Here it is Grid.
Tip There are lined, dotted, music and planner pages too.
Tip There are lined, dotted, music and planner pages too.
-
Open the first page
Tap Start Drawing.
Tap Start Drawing.
Tip Tick Don't show this again to skip this page next time.
Tip Tick Don't show this again to skip this page next time.
-
Write with Apple Pencil
Just write, as on paper. Your hand can rest on the screen while you write.
Just write with one finger. To scroll, use two fingers.
-
Change the colour
Tap the round dial next to the pens, then tap a colour.
Tap the round dial next to the pens, then tap a colour.
Tip Hold the dial and slide up or down to make the line thicker or thinner.
Tip Hold the dial and slide up or down to make the line thicker or thinner.
-
Erase a word
Tap Eraser, then rub over the word.
Tap Eraser, then rub over the word.
Tip Tap Eraser again to choose how it erases.
Tip Tap Eraser again to choose how it erases.
-
Undo a mistake
Tap Undo to bring back what you just erased.
Tap Undo to bring back what you just erased.
Tip Tap the screen with two fingers to undo, or with three fingers to redo.
Tip Tap the screen with two fingers to undo, or with three fingers to redo.
-
Close the document
Tap Close. Pentip saves as you go, so there is no Save button.
Tap Close. Pentip saves as you go, so there is no Save button.
-
Open it again
Your list waits in the library. Tap it to open it.
Your list waits in the library. Tap it to open it.
Chapter 2
Draw and write
Pens and the highlighter, moving things, shapes and straight lines.
-
Switch the tool bar
The bar over your page has four modes. Tap Text or Add to see their tools, and Draw to get your pens back.
The bar over your page has four modes. Tap Text or Add to see their tools, and Draw to get your pens back.
-
Highlight a word
Tap the highlighter, then draw over a word.
Tap the highlighter, then draw over a word.
-
Change the pen
Tap the pen you are using once more and pick another kind, like Fountain.
Tap the pen you are using once more and pick another kind, like Fountain.
Tip The same panel sets the size, the colour and how see-through it is.
Tip The same panel sets the size, the colour and how see-through it is.
-
Move something
Tap Select, draw a box around something, then drag it.
Tap Select, draw a box around something, then drag it.
Tip Pull a corner to resize it, or turn it with the round handle.
Tip Pull a corner to resize it, or turn it with the round handle.
-
Draw a shape
Tap Add, then Shape, and drag on the page.
Tap Add, then Shape, and drag on the page.
Tip Tap Shape again to pick a circle, a line, a triangle or a polygon.
Tip Tap Shape again to pick a circle, a line, a triangle or a polygon.
-
Shape Snap
Pentip Pro
Draw a line, circle, rectangle or triangle by hand and hold the pen still at the end. A moment later it turns into a clean shape. To turn it on, tap More (•••) at the top, then Settings, and look under Drawing.
Draw a line, circle, rectangle or triangle by hand and hold the pen still at the end. A moment later it turns into a clean shape. To turn it on, tap More (•••) at the top, then Settings, and look under Drawing.
-
Draw a straight line
Tap Ruler, then draw along its edge.
Tap Ruler, then draw along its edge.
Tip Move the ruler with one finger and turn it with two.
Tip Move the ruler with one finger and turn it with two.
-
Read without drawing
Tap View. Now Apple Pencil and your fingers only scroll and zoom.
Tap View. Now your finger only scrolls and zooms.
Tip Tap Draw to write again.
Tip Tap Draw to write again.
-
Move the tool bar
Drag the tool bar to any edge of the screen.
Drag the tool bar to any edge of the screen.
Tip Drop it in a corner and it shrinks to one round button.
Tip Drop it in a corner and it shrinks to one round button.
-
Apple Pencil shortcuts
Double-tap Apple Pencil to switch to the eraser and back. On Apple Pencil Pro, squeeze to open a palette right at the tip. Choose what both do in Settings under Apple Pencil.
Double-tap Apple Pencil to switch to the eraser and back. On Apple Pencil Pro, squeeze to open a palette right at the tip. Choose what both do in Settings under Apple Pencil.
Chapter 3
Pages and sections
Add pages, change the paper, keep several parts in one document, and see them all at once.
-
Add a page
Tap + at the end of the page strip.
Tap + at the end of the page strip.
Tip Hold a page in the strip to Duplicate it, add a page before or after it, or Delete it.
Tip Hold a page in the strip to Duplicate it, add a page before or after it, or Delete it.
-
Zoom in and out
New in Pentip 5
Pinch with two fingers to zoom in and out.
Pinch with two fingers to zoom in and out.
Tip Pinch in far enough and all your pages are on screen at once.
Tip Pinch in far enough and all your pages are on screen at once.
-
Change the paper
New in Pentip 5
Tap More (•••), then Section Template, and pick a paper.
Tap More (•••), then Section Template, and pick a paper.
Tip Only this section changes. Every section keeps its own paper.
Tip Only this section changes. Every section keeps its own paper.
-
Add a layer
Tap More (•••), then Layers, then New Layer.
Tap More (•••), then Layers, then New Layer.
Tip Draw on up to five layers. Tap the eye to hide one, or drag it to a new place.
Tip Draw on up to five layers. Tap the eye to hide one, or drag it to a new place.
-
Add a section
Tap + next to the section tabs at the top.
Tap + next to the section tabs at the top.
Tip Each section has its own pages and paper, like the tabs in a binder. Hold a tab to duplicate or delete it.
Tip Each section has its own pages and paper, like the tabs in a binder. Hold a tab to duplicate or delete it.
Chapter 4
Type
Type on the page, format your words, and add lists, tables and text frames.
-
Type on the page
Tap Text in the tool bar, then tap the page and type.
Tap Text in the tool bar, then tap the page and type.
Tip Start a line with a dash and a space for a bulleted list, or with 1. and a space for a numbered one.
Tip Start a line with a dash and a space for a bulleted list, or with 1. and a space for a numbered one.
-
Highlight words
New in Pentip 5
Double-tap a word, then tap Highlight in the bar and pick a colour.
Double-tap a word, then tap Highlight in the bar and pick a colour.
Tip More options (•••) in the same bar has the font, the size, bold, italic and underline.
Tip More options (•••) in the same bar has the font, the size, bold, italic and underline.
-
Make a checklist
Tap the cursor to bring up the bar, then tap Insert (+) and Checklist.
Tap the cursor to bring up the bar, then tap Insert (+) and Checklist.
Tip Bullets and Numbered are in the same place. Tap a box to tick it.
Tip On iPhone, tick boxes in View or with the Text tool, so the tap does not draw.
-
Add a table
New in Pentip 5
In the bar, tap Insert (+), then Table, and choose the rows and columns.
In the bar, tap Insert (+), then Table, and choose the rows and columns.
Tip Double-tap a cell to type in it. A long table carries on over the next page.
Tip Double-tap a cell to type in it. A long table carries on over the next page.
-
Type anywhere
New in Pentip 5
Tap Free Text, then tap anywhere on the page and type.
Tap Free Text, then tap anywhere on the page and type.
Tip Tap a frame to select it, then drag it to move it or pull its dots to resize it.
Tip Tap a frame to select it, then drag it to move it or pull its dots to resize it.
-
Right-to-left text
Arabic and English can share a page: every paragraph runs in its own direction. To set it yourself, select the text, tap More options (•••), then the ¶ button.
Arabic and English can share a page: every paragraph runs in its own direction. To set it yourself, select the text, tap More options (•••), then the ¶ button.
Chapter 5
Pictures, scans and PDFs
Add photos, scan paper pages, and write on PDFs, fill in their forms and sign them.
-
Add a picture
Tap Add, then Image, and choose a photo.
Tap Add, then Image, and choose a photo.
Tip To put a photo between typed words, tap Insert (+) in the text bar, then Photo.
Tip To put a photo between typed words, tap Insert (+) in the text bar, then Photo.
-
Scan paper
Tap Scan at the bottom of the library to turn paper pages into a new document, or Add then Scan in a document to add them as pages. Hold your device over the paper and the edges are found for you. Adjust the corners and the colours, then tap Create Document or Add to Document.
Tap Scan at the bottom of the library to turn paper pages into a new document, or Add then Scan in a document to add them as pages. Hold your device over the paper and the edges are found for you. Adjust the corners and the colours, then tap Create Document or Add to Document.
-
Open a PDF
In the library, tap Import, then Import PDF, and pick the file.
In the library, tap Import, then Import PDF, and pick the file.
Tip Every page becomes a section you can write on. You can also open a PDF from Files, Mail or Safari.
Tip Every page becomes a section you can write on. You can also open a PDF from Files, Mail or Safari.
-
Mark up a PDF
Pick the highlighter and draw over a line, the same as on paper.
Pick the highlighter and draw over a line, the same as on paper.
Tip Hold a finger on the PDF's text to select it, then copy it, look it up or translate it.
Tip Hold a finger on the PDF's text to select it, then copy it, look it up or translate it.
-
Fill in a form
Tap a field with your finger and type.
Tap View, then tap a field and type.
Tip Tap a box to tick it.
Tip Tap a box to tick it.
-
Sign it
Write your signature on the line with Apple Pencil.
Tap Draw, then write your signature on the line with your finger.
-
Follow links
New in Pentip 5
Tap a link in a PDF with your finger. If it leads to another page, a bar shows for a few seconds: tap Back to page to return.
Tap a link in a PDF with your finger. If it leads to another page, a bar shows for a few seconds: tap Back to page to return.
Chapter 6
Flashcards
Write cards by hand, study them in order or shuffled, and see how you did.
-
Make flashcards
New in Pentip 5
In the library, tap New, then New Flashcards.
In the library, tap New, then New Flashcards.
Tip To name the deck, hold it in the library and choose Rename.
Tip To name the deck, hold it in the library and choose Rename.
-
Write a question
New in Pentip 5
Write the question on the card.
Write the question on the card.
Tip Each card has two sides: the question goes on the front.
Tip Each card has two sides: the question goes on the front.
-
Write the answer
New in Pentip 5
Tap Front Side to turn the card over, then write the answer on the back.
Tap Front Side to turn the card over, then write the answer on the back.
Tip Both Sides, next to it, shows the question and the answer together.
Tip Both Sides, next to it, shows the question and the answer together.
-
Add a card
New in Pentip 5
Tap + next to the cards at the top.
Tap + next to the cards at the top.
Tip Hold a card at the top to duplicate or delete it.
Tip Hold a card at the top to duplicate or delete it.
-
Study
New in Pentip 5
Tap Study, then In Order.
Tap Study, then In Order.
Tip Rather type a card? Tap Cards while you study, then Add Card.
Tip Rather type a card? Tap Cards while you study, then Add Card.
-
Check yourself
New in Pentip 5
Think of the answer, tap Show Answer, then say how it went.
Think of the answer, tap Show Answer, then say how it went.
Tip Pick Again, Hard, Good or Easy: the cards you find hard come back sooner.
Tip Pick Again, Hard, Good or Easy: the cards you find hard come back sooner.
-
See how you did
New in Pentip 5
After the last card you see how many you knew, how long it took and your best streak.
After the last card you see how many you knew, how long it took and your best streak.
Tip Practice Missed Cards goes over the ones you missed.
Tip Practice Missed Cards goes over the ones you missed.
Chapter 7
Whiteboard
One big board with no pages: start anywhere and keep going.
-
Make a whiteboard
New in Pentip 5
In the library, tap New, then New Whiteboard.
In the library, tap New, then New Whiteboard.
Tip To name it, hold it in the library and choose Rename.
Tip To name it, hold it in the library and choose Rename.
-
Draw anywhere
New in Pentip 5
Write and draw anywhere on the board.
Write and draw anywhere on the board.
Tip The board grows as you go: draw near the edge and there is more room.
Tip The board grows as you go: draw near the edge and there is more room.
-
Find your way around
New in Pentip 5
Move around the board, and the map in the corner shows where you are.
Move around the board, and the map in the corner shows where you are.
Tip Tap a spot on the map to go there, or drag its box.
Tip Tap a spot on the map to go there, or drag its box.
Chapter 8
Find and organize
Search everything you wrote, sort documents into folders, and get back what you deleted.
-
Search your notes
Tap the magnifying glass at the top of the library and type a word.
Tap the magnifying glass at the top of the library and type a word.
Tip Pentip finds names, typed text, PDFs, form fields and even your handwriting. Tap a result to open that page.
Tip Pentip finds names, typed text, PDFs, form fields and even your handwriting. Tap a result to open that page.
-
Find in a document
New in Pentip 5
Tap More (•••), then Find in Document, and type a word.
Tap More (•••), then Find in Document, and type a word.
Tip Pentip looks only in the section you’re in. Every match is marked on the page, and the arrows take you from one to the next.
Tip Pentip looks only in the section you’re in. Every match is marked on the page, and the arrows take you from one to the next.
-
Make a folder
Tap New, then New Folder, give it a name and tap Done.
Tap New, then New Folder, give it a name and tap Done.
Tip Drag documents onto a folder to move them in, or hold a document and choose Move.
Tip Drag documents onto a folder to move them in, or hold a document and choose Move.
-
Get back what you deleted
Deleted documents go to Recently Deleted in the bar on the left and stay there for 30 days. Hold one and tap Recover to bring it back.
Deleted documents go to Recently Deleted in the bar on the left and stay there for 30 days. Hold one and tap Recover to bring it back.
Chapter 9
Make it yours
Smart Dark, settings, export, iCloud and Siri.
-
Turn on Smart Dark
Tap More (•••), then On under Smart Dark.
Tap More (•••), then On under Smart Dark.
Tip Auto follows the look of the app. The document itself does not change, so it is light again when you share it.
Tip Auto follows the look of the app. The document itself does not change, so it is light again when you share it.
-
Document settings
Tap More (•••), then Settings.
Tap More (•••), then Settings.
Tip Change this document's paper, background colour and page layout, and helpers like Shape Snap and the Stroke Stabilizer.
Tip Change this document's paper, background colour and page layout, and helpers like Shape Snap and the Stroke Stabilizer.
-
App settings
In the library, tap Settings at the bottom of the bar on the left.
In the library, tap Settings at the bottom of the bar on the left.
Tip Choose the look and the language, what Apple Pencil's double-tap does, where new documents are saved and how they start.
Tip Choose the look and the language, where new documents are saved and how they start.
-
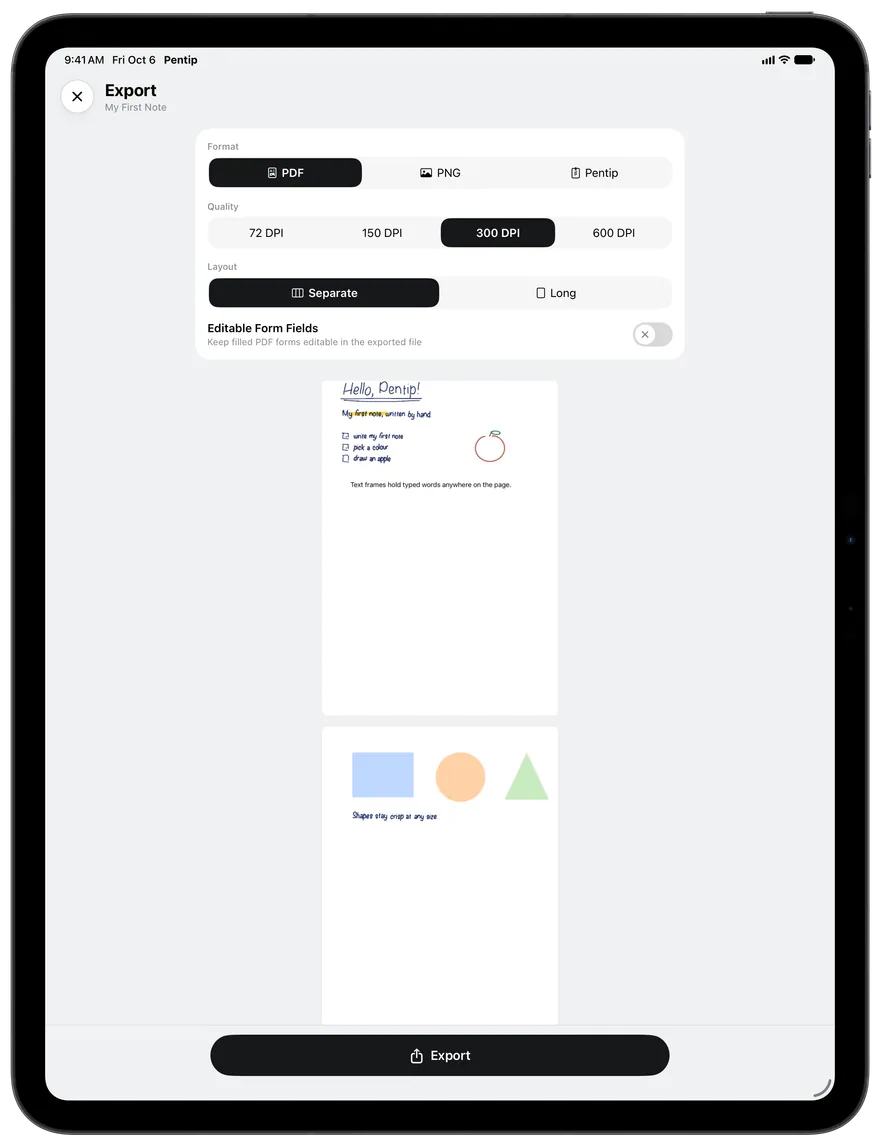
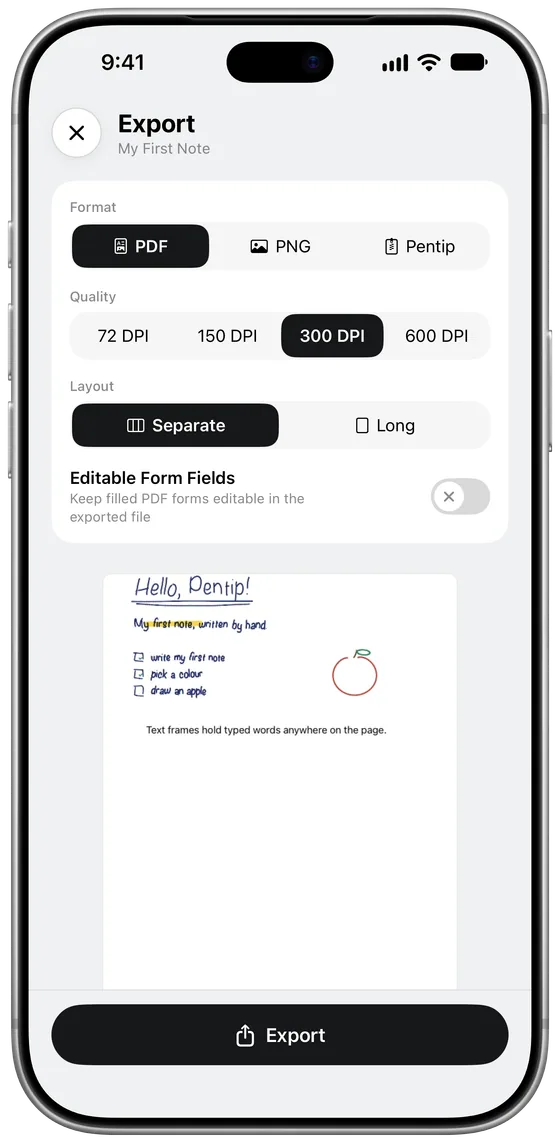
Export as PDF or picture
Pentip Pro
Tap More (•••), then Export. Choose PDF or PNG, the quality and the sections to include, then tap Export to save, print or send it.
Tap More (•••), then Export. Choose PDF or PNG, the quality and the sections to include, then tap Export to save, print or send it.
Tip To send a document to someone who uses Pentip, hold it in the library and tap Share.
Tip To send a document to someone who uses Pentip, hold it in the library and tap Share.
-
iCloud on all your devices
Pentip Pro
Turn on iCloud Sync in Settings, and documents in iCloud are the same on your iPad, iPhone and Mac. To keep one on this device only, hold it and choose Make Local Only.
Turn on iCloud Sync in Settings, and documents in iCloud are the same on your iPad, iPhone and Mac. To keep one on this device only, hold it and choose Make Local Only.
-
Siri and Shortcuts
New in Pentip 5
Say “Create a document in Pentip” or “Search my notes in Pentip”. The Shortcuts app has Pentip actions too, for example to add flashcards or text to a document.
Say “Create a document in Pentip” or “Search my notes in Pentip”. The Shortcuts app has Pentip actions too, for example to add flashcards or text to a document.
-
Free and Pro
Your first five documents are free, with every tool. Pentip Pro adds unlimited documents, iCloud sync, export to PDF and images, your own templates and Shape Snap.
Your first five documents are free, with every tool. Pentip Pro adds unlimited documents, iCloud sync, export to PDF and images, your own templates and Shape Snap.
-
What's new
Tap What's New at the bottom of the bar on the left.
Tap What's New at the bottom of the bar on the left.
Tip How to Use Pentip, right next to it, brings you back to this guide.
Tip How to Use Pentip, right next to it, brings you back to this guide.
Start writing.
Pentip is free to download on the App Store.